September 15, 2026 | Resources | Mohit Goyal
I Compressed 40 Images Under 1MB Without Uploading a Single One — Here's How
Last week a client sent me a Google Drive folder with 40 product photos and one line: "Can you get these on the site by tonight? The CMS keeps rejecting them."
The CMS had a 1MB per-image cap. The photos were 3–8 MB each, straight off an iPhone, half of them in HEIC. I've done this dance before — open a "free" compressor, upload the batch, wait, hit a daily limit, get a popup to upgrade, download a ZIP, discover two files are still over the limit, repeat.
This time I tried something different: Under1MB, a tool that does the whole job inside your browser tab. No upload. No account. Forty files were done in under two minutes, and not one byte left my laptop.
This post is my honest, hands-on write-up: what I needed, how I got every image under 1MB, what actually happened to quality, and where the tool falls short. If you just want the workflow, skip to the step-by-step.
TL;DR — key takeaways
- Under1MB compresses, converts and resizes images entirely in your browser. Nothing is uploaded — you can prove it in your Network tab in 20 seconds.
- Type a target size (1 MB, 500 KB, 100 KB) and it finds the highest quality that fits, per file, across a whole batch.
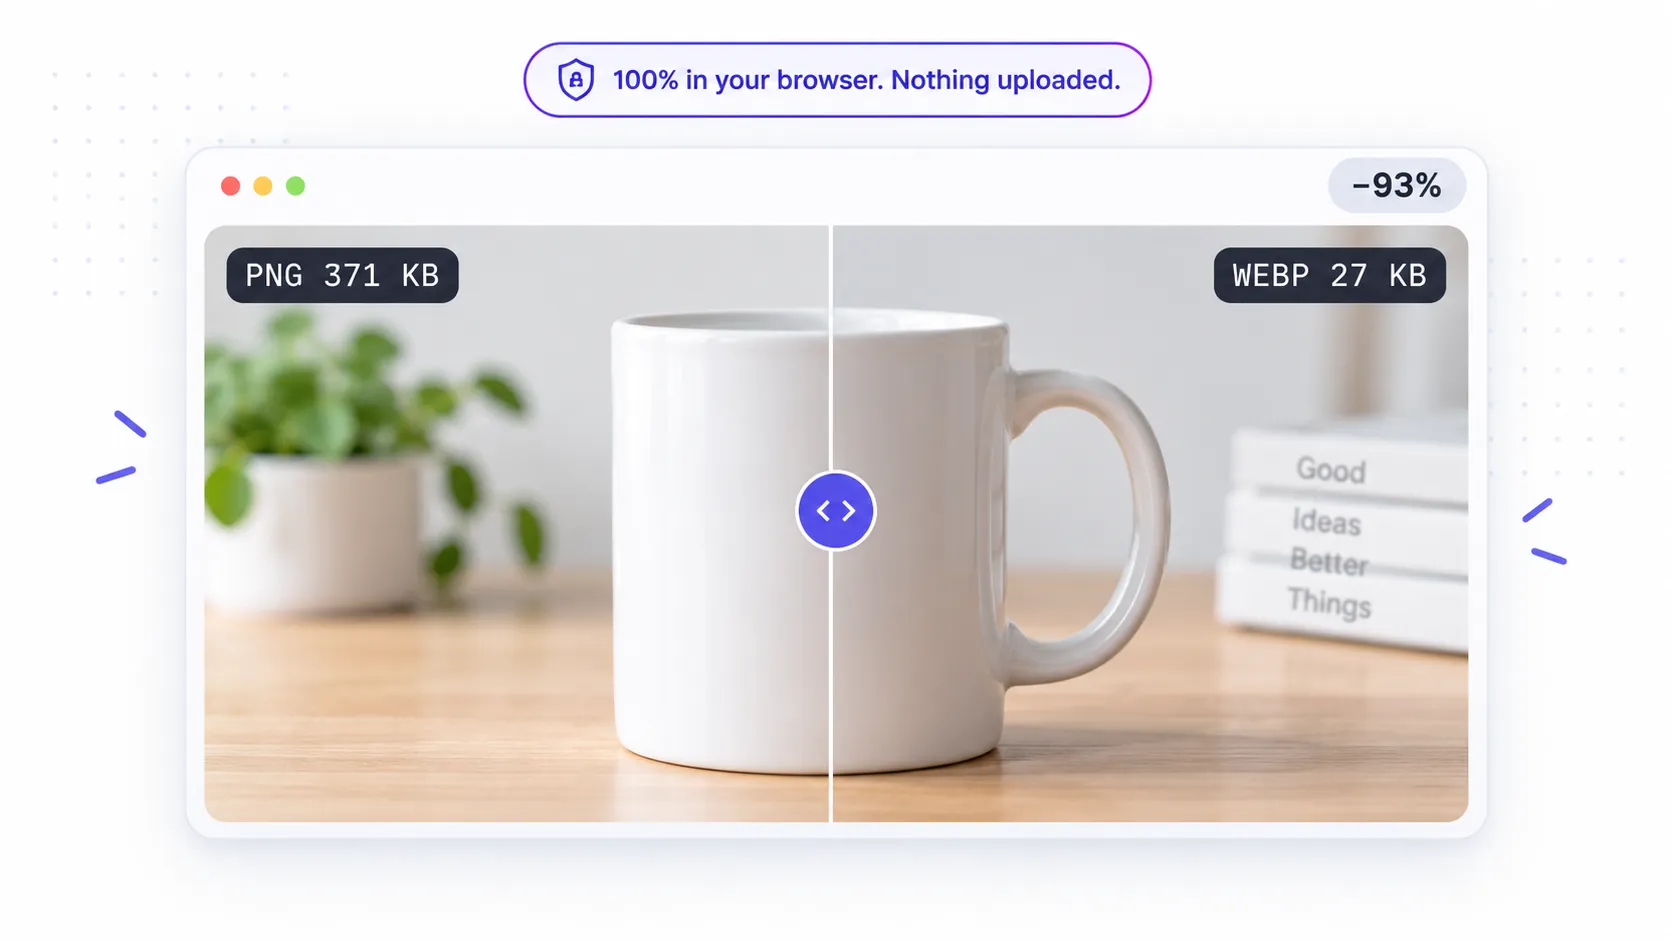
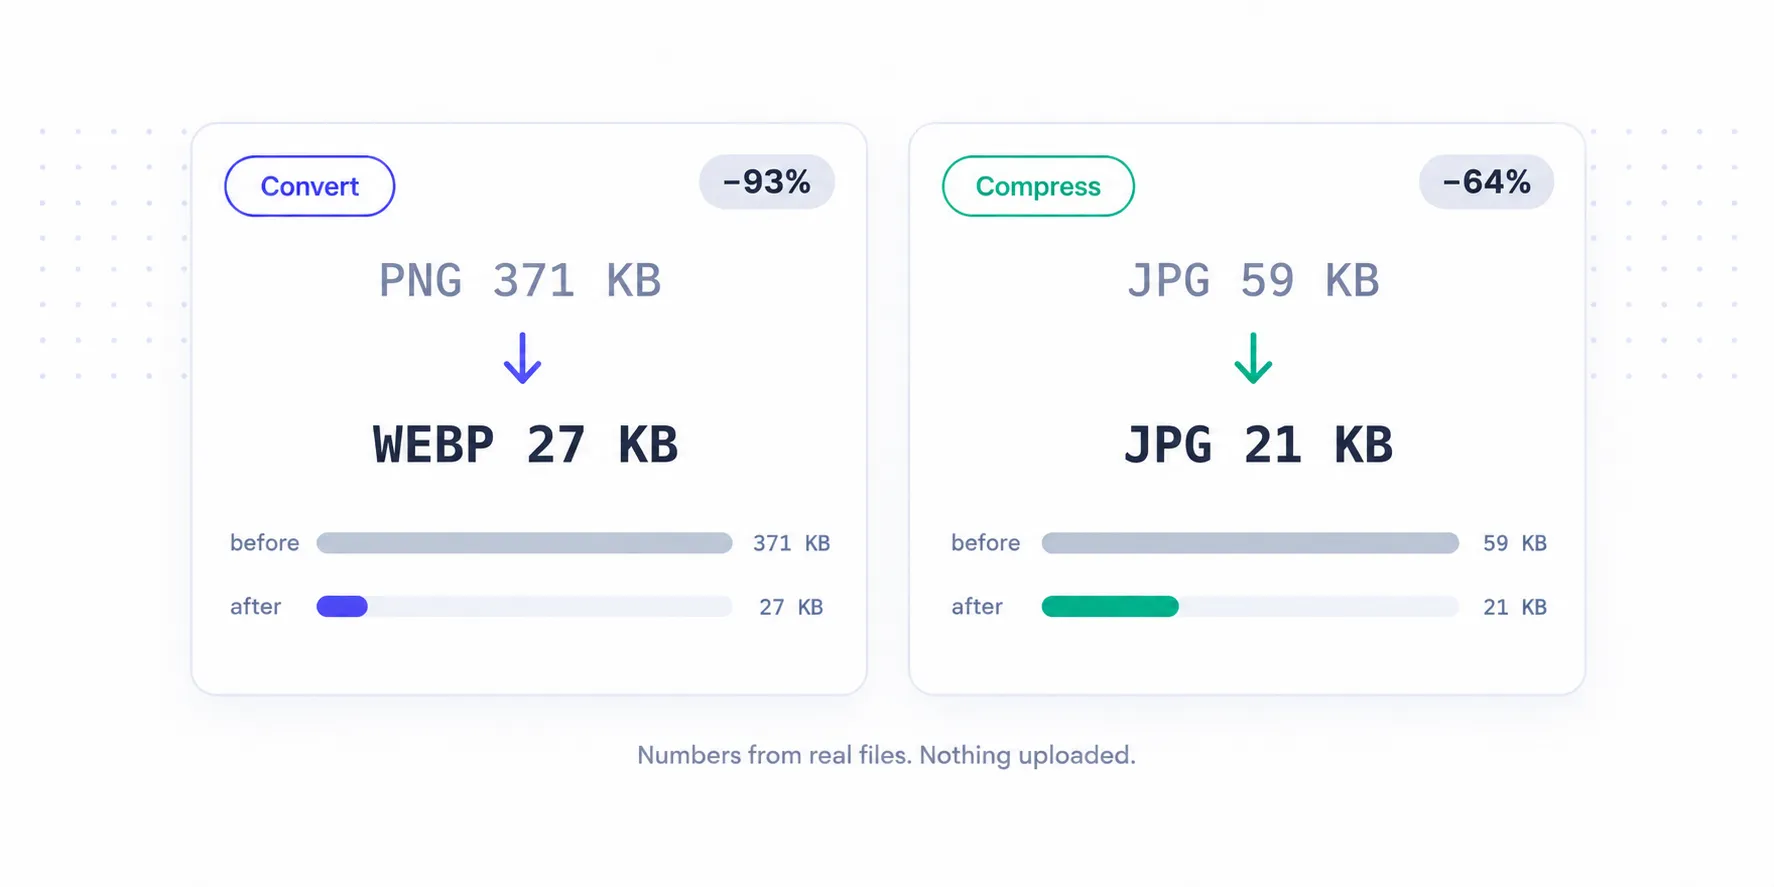
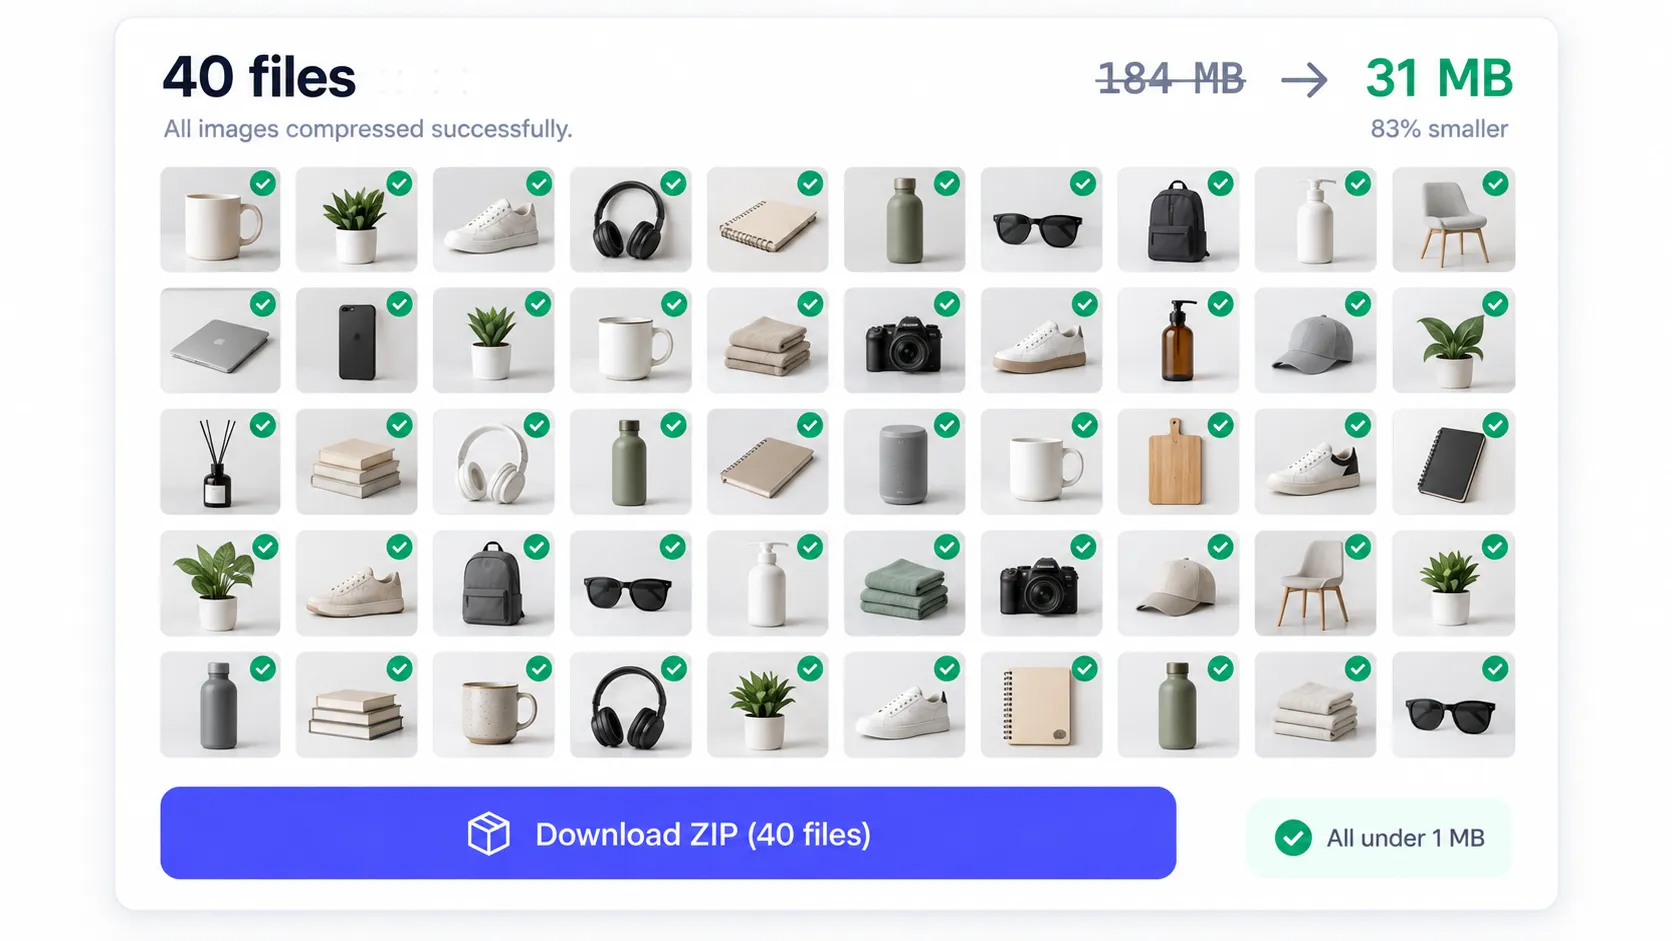
- Real numbers: a 371 KB PNG became a 27 KB WEBP (−93%); a 59 KB JPG became 21 KB (−64%); my 40-file batch went from ~184 MB to ~31 MB with zero rejections.
- 11 formats including HEIC, AVIF and SVG. TIFF, PSD and RAW are still on the roadmap.
- Free, no account, no daily limit — there's no server to meter you.
- Best for: CMS uploads, government/job portals, email, iPhone HEIC photos, and page-speed work.
In this post
- Why "under 1MB" keeps coming up
- The problem with most online image compressors
- What Under1MB actually does
- How I got every image under 1MB (step by step)
- Real results: before and after
- Which format should you actually use?
- How it works under the hood (for developers)
- What I liked
- What I didn't like
- Under1MB vs. upload-based compressors
- Who should use this
- FAQ
- The bottom line
Why "under 1MB" keeps coming up
If you've ever been told your image is "too large to upload," it was probably a 1MB wall. It's the most common file-size limit on the internet:
- CMS platforms — WordPress, Shopify, Ghost and Webflow either enforce or strongly recommend ~1MB per image for page-speed reasons.
- Government and admission portals — passport photos, ID uploads, college applications. In India especially, half the forms I fill out say "max 1MB" or worse, "max 100KB".
- Job portals and CVs — headshots get bounced constantly.
- Email — Gmail's 25MB attachment cap fills up fast with a dozen 4MB photos.
- Core Web Vitals — Google's page-speed signals punish heavy images. A 4MB hero image can single-handedly tank your Largest Contentful Paint score.
So "compress image under 1MB" isn't really one task. It's dozens of small, annoying tasks — and the tooling has historically been terrible for privacy.
The problem with most online image compressors
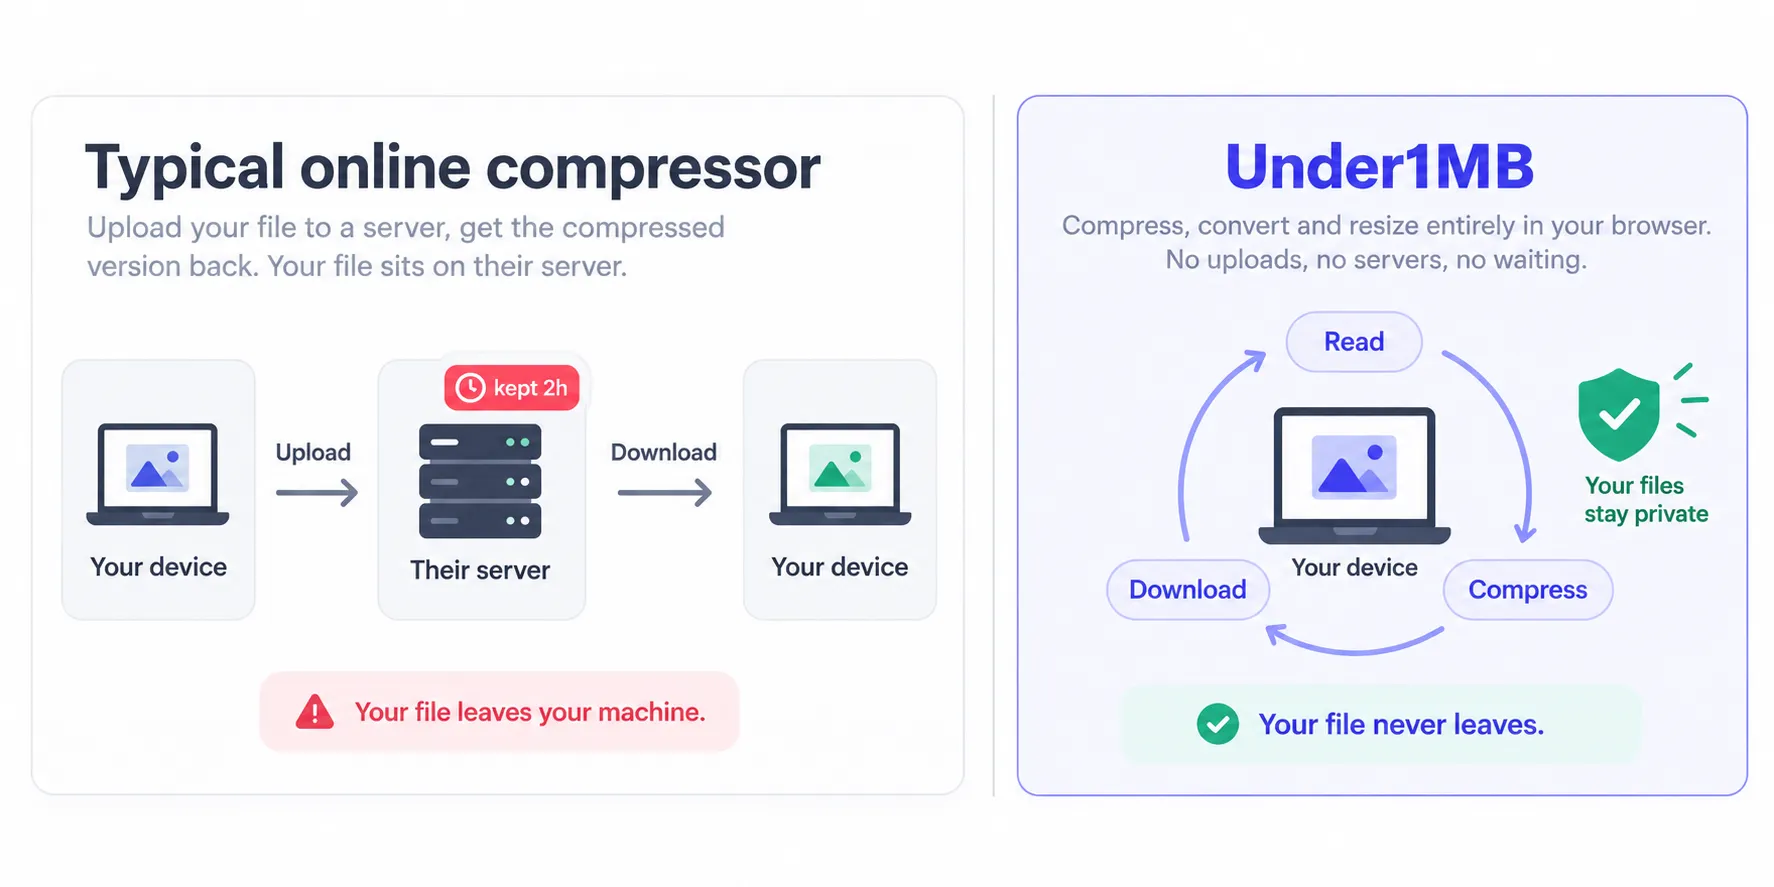
Here's what almost every "free online image compressor" actually does:
- You upload your photo to their server.
- Their server compresses it.
- You download the result.
- They promise to delete your file in 1–24 hours.
Read that again. Your client's unreleased product shots, your passport scan, your kid's school ID photo — all sitting on a stranger's server on the strength of a promise. Several popular tools openly state that uploads are retained for a couple of hours. Others add reCAPTCHA, daily limits, and "Pro" nags on top.
I'm not paranoid about this, but I am a web developer, and I know how easy it is to build image compression that never needs a server at all. Modern browsers can decode and re-encode JPEG, PNG, WEBP and even AVIF natively. There's simply no technical reason your files should go anywhere.
That's the entire pitch of Under1MB: the file is read from your disk into the tab, processed by your own CPU, and downloaded from memory. There's no upload because there's nowhere to upload to.
What Under1MB actually does
Three tools, all client-side:
| Tool | What it does | Where to try it |
|---|---|---|
| Convert | Changes the format (PNG → WEBP, HEIC → JPG, SVG → PNG) and auto-compresses at a sensible default | under1mb.app/convert/ |
| Compress | Keeps the format, shrinks the file — with a quality slider or a target file size | under1mb.app/compress/ |
| Resize | Changes pixel dimensions, with presets for things like Instagram squares | under1mb.app/resize/ |
It supports 11 formats at the time of writing: PNG, JPG, JFIF, WEBP, AVIF, GIF, BMP, ICO, HEIC, HEIF and SVG. TIFF, PSD and RAW formats are listed as "coming soon."
The feature I ended up caring about most is the one the product is named after: type a target size and it finds the highest quality that fits. More on that below.
How I got every image under 1MB (step by step)
Here's the exact workflow I used for the 40-file batch. Total time: about 90 seconds of actual work.
Step 1: Convert the HEIC files first
About 20 of the photos were HEIC (iPhone's default). Most CMSes can't even display HEIC, so these needed a format change regardless of size.
I dropped all 20 onto the HEIC to JPG converter, left the default quality alone, and downloaded a single ZIP. Every file came out under 1MB on the first pass — the default compression is genuinely tuned, not a "re-save at 100% quality" trick.
If your site serves WEBP (and in 2026, it should), HEIC to WEBP is the better target. Smaller files, same visual result.
Step 2: Target-size compress the JPGs
The remaining 20 were already JPGs, just too big. This is where the target-size compressor earns its name.
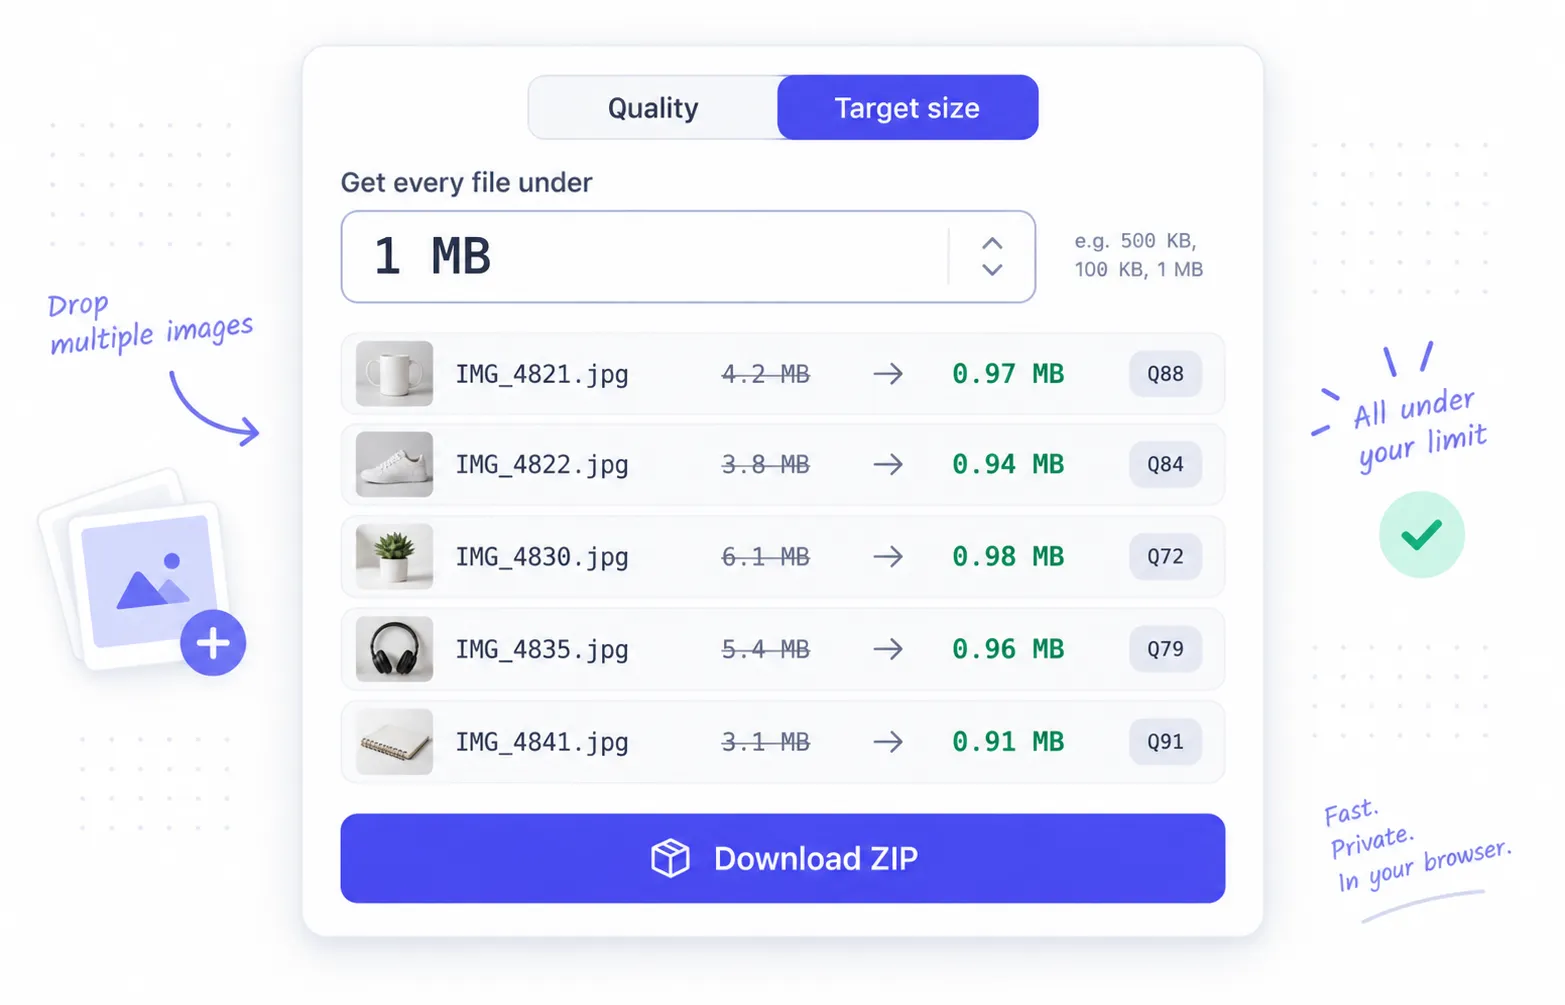
Instead of dragging a quality slider and guessing, you type 1 MB (or 500 KB, or 100 KB) and the tool iterates on quality until the output lands just under your number. For a batch, it does this per file — so a simple product-on-white shot might land at quality 88 while a busy lifestyle shot lands at quality 72. Each one gets the best quality that particular image can afford.
This is the single biggest workflow improvement over slider-based tools. I wasn't compressing to a quality number; I was compressing to a requirement.
Quick links if your limit isn't 1MB:
Step 3: Verify (the 20-second privacy check)
Because I'm a developer and I don't take privacy claims at face value, I did the thing the site itself dares you to do:
- Press F12 to open DevTools.
- Go to the Network tab and clear it.
- Drop an image and hit Convert.
- Watch the list.
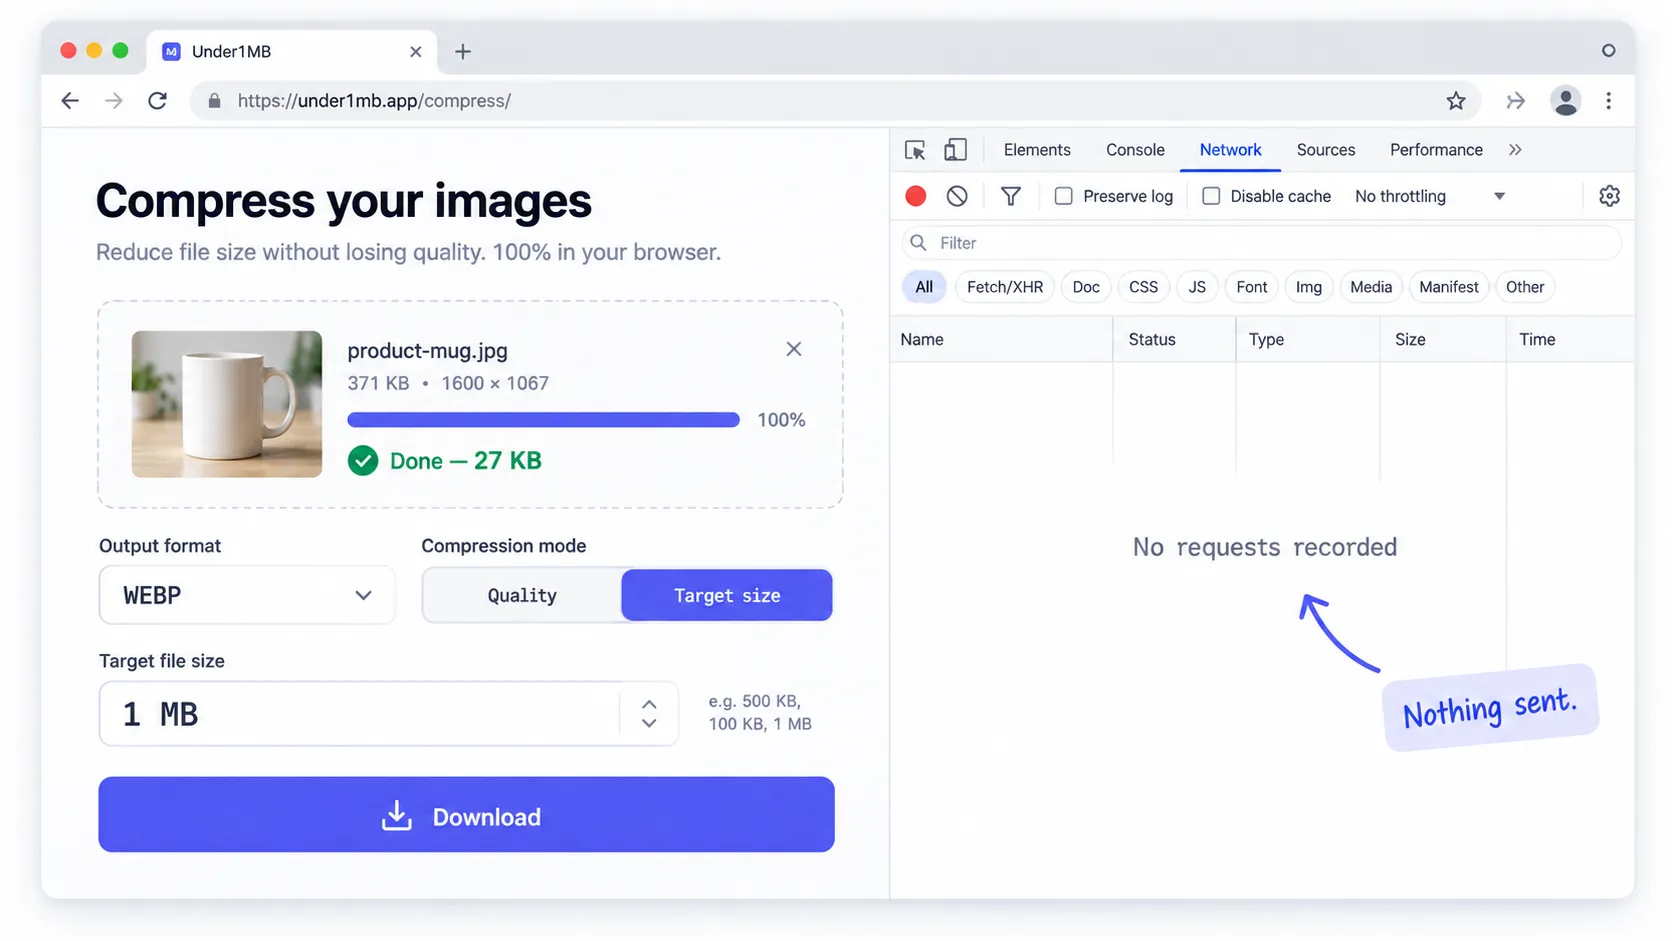
It stayed empty. One tiny analytics ping on page load, then nothing during processing. No POST request, no blob upload, no "temporary storage." I've run this check on a lot of tools that claim to be "secure," and this is the first time the Network tab actually backed the claim up.
If you only remember one thing from this post: you can verify any "private" tool in 20 seconds this way. Do it.
Real results: before and after
I'm not going to hand-wave with "up to 90% smaller!" Here are the actual numbers from the homepage demo (which I re-ran myself) and my own batch.
Convert: PNG → WEBP
| Before | After | Reduction | |
|---|---|---|---|
| Sample product photo | 371 KB PNG | 27 KB WEBP | −93% |
The homepage has a drag-to-compare slider on this exact image. I dragged it back and forth at 2× zoom looking for artifacts on the product edges. Couldn't find any. Try it yourself on the PNG to WEBP page.
Compress: JPG → JPG
| Before | After | Reduction | |
|---|---|---|---|
| Sample product photo | 59 KB JPG | 21 KB JPG | −64% |
Same format, roughly a third of the size. This is the "keep the file type, trim the fat" mode — useful when a platform insists on JPG.
My 40-file batch
| Before | After | |
|---|---|---|
| Total size | ~184 MB | ~31 MB |
| Files over 1MB | 40 | 0 |
| Files rejected by CMS | 40 | 0 |
| Uploads to a third-party server | — | 0 |
The client approved every image without noticing they'd been compressed. That's the whole test.
Which format should you actually use?
This comes up every time I explain WEBP to a client, so here's the cheat sheet I use:
- JPG — Photos where compatibility matters most (email, WhatsApp, print shops, old CMSes). Compress JPG →
- PNG — Anything with transparency or sharp text/UI. Big files, so compress your PNGs or convert them.
- WEBP — The default for the web in 2026. Roughly 25–35% smaller than JPG at the same visual quality, supported by every modern browser. PNG to WEBP →
- AVIF — The smallest files, period. Independent browser-side benchmarks published this year found AVIF around 50% smaller than JPEG and ~30% smaller than WEBP at equivalent quality. Support is now broad enough for production if you keep a WEBP fallback. PNG to AVIF →
- ICO — Favicons. PNG to ICO in one click is a small thing that saves me a surprising amount of time.
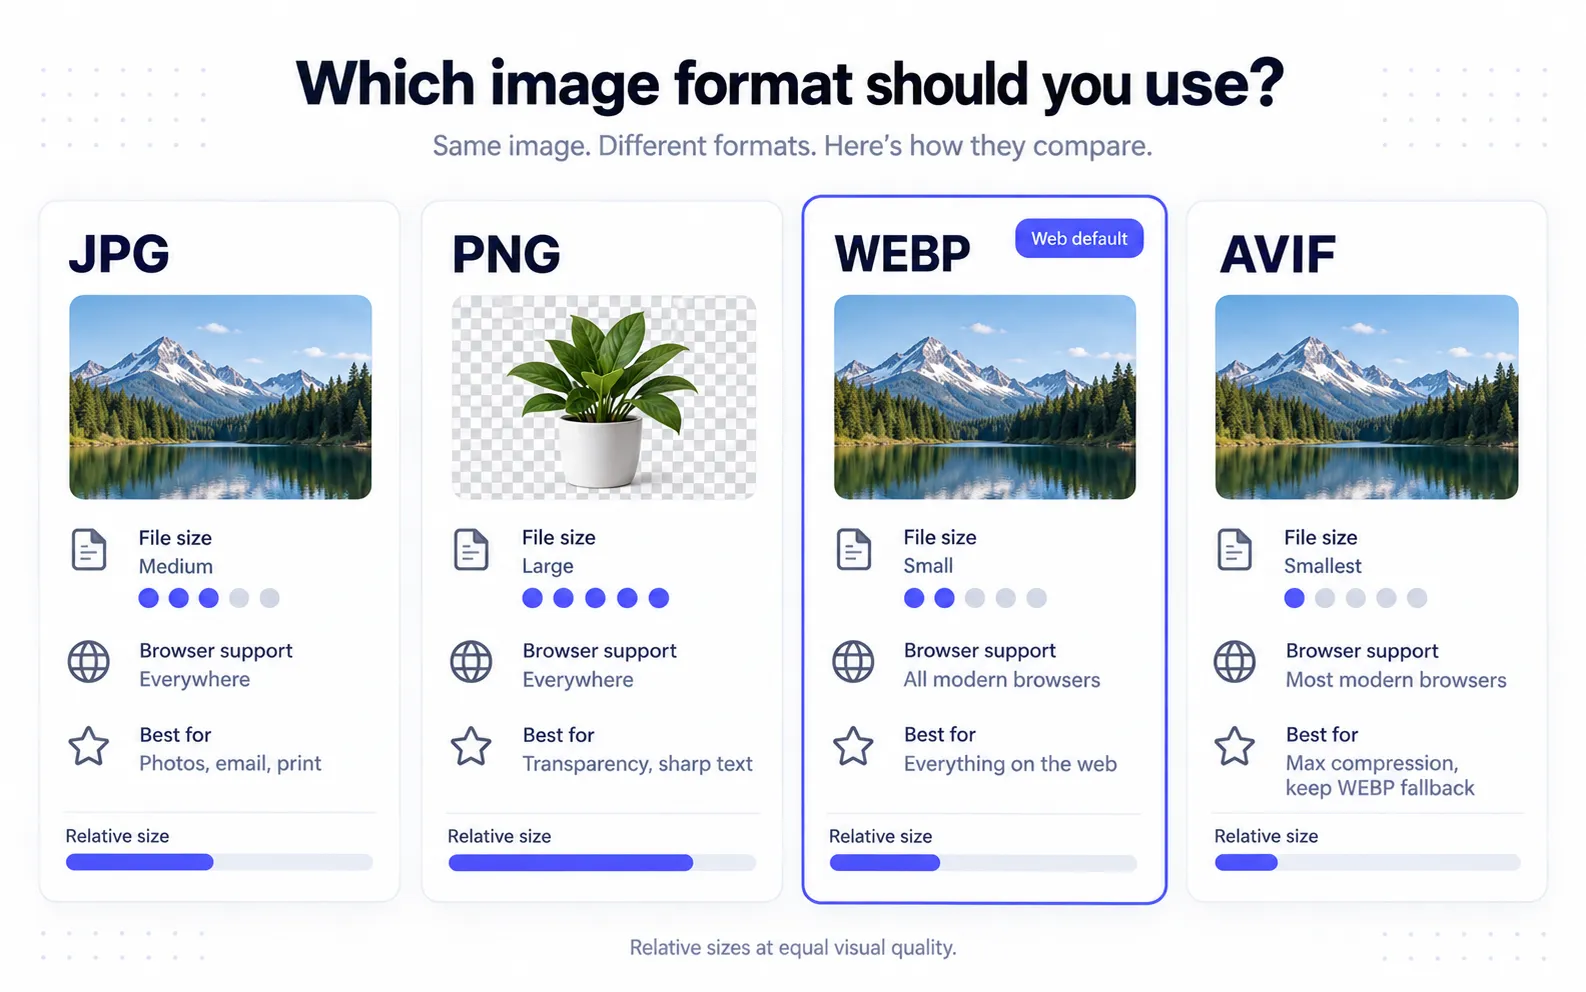
Full breakdown on the formats page.
How it works under the hood (for developers)
If you build for the web, here's why none of this needs a server.
Every modern browser ships an image decoder and encoder. When you drop a file, the tool reads it with the File API, decodes it into an ImageBitmap, and draws it onto an off-screen <canvas>. From there, canvas.toBlob(callback, mimeType, quality) re-encodes the pixels into JPEG, WEBP or PNG at whatever quality you pass — using the same codecs the browser uses to render images every day. AVIF encoding and HEIC decoding go through WebAssembly builds of the open-source codecs, running in a Web Worker so the UI stays responsive.
Target-size mode is just a search. File size isn't a linear function of the quality number — a busy photo at Q80 can be twice the size of a flat graphic at Q80. So instead of guessing, the tool runs a binary search: encode at Q90, check the blob's .size, too big → try Q70, too small → try Q80, and so on. Each encode takes a few milliseconds, so it converges in six or seven passes — well under a second per image. That's why each file in a batch lands at a different quality: it's the highest one whose output fits under your number.
The download is a Blob served through URL.createObjectURL(), and URL.revokeObjectURL() frees it when you clear. No bytes ever leave the tab.
Want to build your own? MDN's docs on HTMLCanvasElement.toBlob() are the whole starting point.
What I liked
It's actually free. No account, no card, no daily meter. There's no server, so there's nothing to meter. A paid Pro tier for teams and automation is planned, and the site is explicit that it will charge for automation, never for privacy. That's the right line to draw.
Batch with ZIP download. Drop a folder, get one ZIP back. The only limit is your browser's memory — I did 40 files on an 8GB laptop without issue.
Target size as the primary control. Most tools bury this or don't have it. Here it's the headline feature, and it's the one that maps to how people actually think ("it needs to be under 500KB").
Works on mobile. I tested on iPhone Safari. Same experience, same zero uploads. Handy for the "compress this photo for the government portal" situations that always happen on a phone.
Speed. With no round-trip to a server, results appear the moment your CPU finishes. On a modern laptop that's sub-second per image.
What I didn't like (honest edition)
No TIFF, PSD or RAW yet. They're listed on the roadmap. If your workflow starts from camera RAW or Photoshop files, you'll need to export to JPG/PNG first.
GIF only converts from the first frame. It's an image tool, not a video tool, and the site says so. But if you were hoping to compress an animated GIF, this isn't it.
Large batches are bounded by your device. That's the trade-off of doing everything client-side. A 400-file batch on an old phone will struggle. On a laptop, you won't notice.
The name confuses people at first. Under1MB works on any size in and any size out — "1MB" is the job, not a limit. It took me a second to get that too.
Under1MB vs. upload-based compressors
| Under1MB | Typical "free online compressor" | |
|---|---|---|
| Files uploaded to a server | Never | Yes |
| Account required | No | Often, after N files |
| Daily limit | None | Common |
| Target file size mode | Yes | Sometimes |
| Batch + ZIP | Yes | Usually paywalled |
| HEIC / AVIF support | Yes | Mixed |
| Works offline after load | Yes | No |
| Cookie banner | None | Almost always |
| Verify privacy yourself | Network tab, 20 seconds | Trust their policy |
The honest summary: server-based tools can sometimes squeeze a few extra percent out of a file with heavier encoders. For 99% of real tasks — CMS uploads, email, forms, social — a browser-side tool gets you there with zero privacy cost.
Who should use this
- Web developers and agencies handing off client assets. Do the compression on your machine, keep the client's unreleased work on your machine.
- Anyone filling out a portal with a strict size limit — passport, visa, college, job applications. Get a photo under 1MB →
- Ecommerce store owners cutting page weight. Compress product PNGs and watch your PageSpeed score move.
- iPhone users who just want their photos to open on a Windows PC. HEIC to JPG →
- Creators prepping for social. Resize for Instagram →
Frequently asked questions
Does Under1MB upload my images anywhere?
No. Processing happens in your browser using built-in image APIs. You can confirm this by opening your browser's Network tab while converting — nothing is sent.
Can I compress an image to under 1MB without losing quality?
Practically, yes. For most photos, the difference between the original and a version compressed to 1MB is invisible on screen. Quality loss only becomes noticeable at very aggressive targets (like 50–100 KB) on detailed images.
Does it only work on files under 1MB?
No. Any size goes in and you can target any size out. The name refers to the most common job people need done, not a file-size limit.
Which formats does it support?
PNG, JPG, JFIF, WEBP, AVIF, GIF, BMP, ICO, HEIC, HEIF and SVG. TIFF, PSD and RAW are on the roadmap.
Is there a batch or file-size limit?
Only your browser's memory. Batch as many as it can hold and download a ZIP.
Is it free?
Yes, with no account or card required. A paid tier for teams and automation is planned, but the core tool is stated to remain free.
Does it work on mobile?
Yes — Chrome, Safari (including iOS), Firefox and Edge are all supported. No app or extension needed.
What's the difference between Convert and Compress?
Convert changes the file format (PNG to WEBP, HEIC to JPG) and compresses automatically at a sensible default. Compress keeps the format you already have and lets you control the size — with a quality slider or a target file size.
How do I open HEIC photos on Windows?
Windows doesn't display HEIC without a paid extension. The fastest fix is to convert HEIC to JPG in the browser — the file never leaves your PC, and JPG opens everywhere.
Does it work offline?
Once the page has loaded, yes. Because the processing engine lives in your browser, you can drop the connection and keep converting.
The bottom line
I've been compressing images for client work for years, and I'd quietly accepted that "upload to a stranger's server" was the price of convenience. Under1MB shows that's just not true anymore. The browser can do the job, do it fast, and do it without ever seeing your files.
For the specific task of getting an image under a size limit — the thing I need most often — the target-size mode is the best implementation I've used.
Try it on a file you already have open: under1mb.app/convert. Then open the Network tab and watch nothing happen.
Have a format you need that isn't supported yet, or a workflow tip I missed? Drop a comment below or reach me on LinkedIn. I'll update this post as the tool adds TIFF and RAW support.